2. Launch it
3. Start to enjoy it
3.1 Windows organization
3.2 setup user_id and group_id
3.3 Create a device
3.4 Create a test tree
3.5 Create a test element
3.6 apply/run test element
3.7 run from test case tree
Welcome to Autotestnet!
1. Install it
1.1 Unzip the file to a directory
For Windows OS, you need extract files to your desired directory.
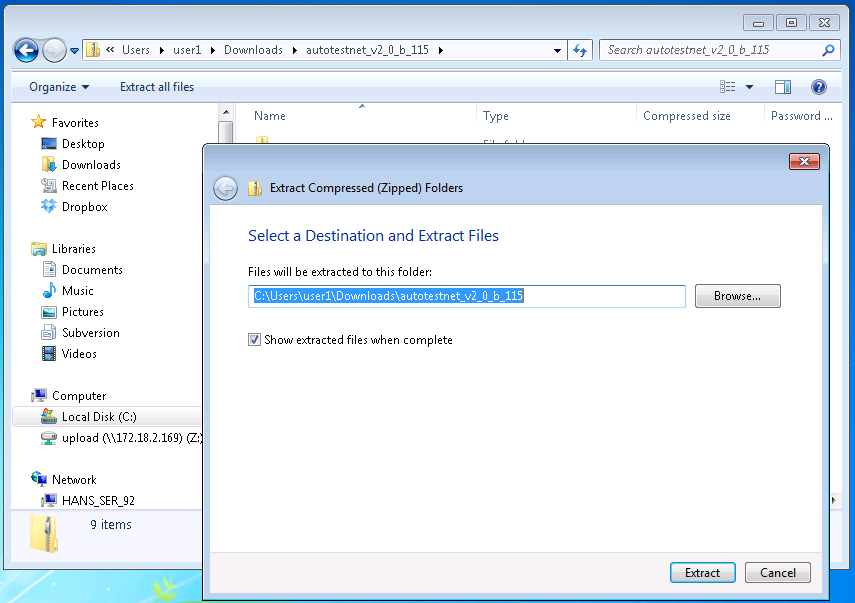
For Linux OS, you need create your desired directory and then unzip the files for that directory:
root@lin150:/env_test/autotestnet_export# mkdir testdir
root@lin150:/env_test/autotestnet_export# cd testdir/
root@lin150:/env_test/autotestnet_export/testdir# unzip ../autotestnet_version_build.zip
Archive:  ../autotestnet_version_build.zip
   creating: app/
  inflating: app/plink.exe
   creating: app/winOS/
   creating: app/linux/
  inflating: app/linux/fgt2eth.pl
  inflating: app/linux/smtp_spam
  inflating: app/linux/pop3_connect.pl
  inflating: app/linux/smtpsocket.pl
  inflating: autotestnet.tcl
   creating: data/
  inflating: data/create_secondaryIP_ipsec_intf.tcl
  inflating: data/create_eicar_filegroup.tcl
  inflating: data/create_multivd_ipsec_intf_in_fgt.tcl
  inflating: data/script_header.txt
  inflating: data/create_multiple_sslvpn_vd_new.tcl
  inflating: data/create_multivd_p3_vip_ippool_in_fgt.tcl
  inflating: data/eml_pkg
  inflating: data/write_curl_config_eicar_100.tcl
  inflating: data/create_secondaryIP_ipsec_intf_central.tcl
  inflating: data/create_multiple_sslvpn_vd.tcl
  inflating: data/create_multiple_sslvpn_vd_ipsec_no_vdlink.tcl
  inflating: data/create_multivd_in_fgt.tcl
  inflating: data/create_multiple_sslvpn_vd_add_ipsec.tcl
  inflating: data/set_ipsec_intf_down.tcl
  inflating: data/create_multivd_ipsec_intf_in_fgt_update1.tcl
  inflating: data/set_ipsec_intf_all_proposal.tcl
  inflating: data/create_vlan_ipsec_tunn_central.tcl
   creating: hlp/
  inflating: hlp/User_guide_for_env_setup_v1.txt
  inflating: hlp/state_field_definition.ods
  inflating: hlp/Env_install
   creating: lib/
  inflating: lib/database_lib.tcl
  inflating: lib/proc_lib.tcl
  inflating: lib/textprops.tcl
  inflating: lib/tools_lib.tcl
  inflating: lib/.common_access.exp.swp
  inflating: lib/common_access.tcl
  inflating: lib/math_lib.tcl
  inflating: lib/runtest_lib.tcl
  inflating: lib/sky_comm.tcl
  inflating: lib/common_variable.tcl
  inflating: lib/folder_disable.GIF
  inflating: lib/tree1.tcl
   creating: log/
  inflating: main.tcl
  inflating: README
  inflating: tags
root@lin150:/env_test/autotestnet_export/testdir# ls
app  autotestnet.tcl  data  hlp  lib  log  main.tcl  README  tags
root@lin150:/env_test/autotestnet_export/testdir#
1.2 Install ActiveTcl 8.4 x86 version from Activestate website
http://www.activestate.com/activetcl/downloads
1.2.1 windows 64bit OS version was not supported yet
1.2.2 windows 32bit OS version
Please be noted, because "Expect for Windows" are only supported in ActiveTcl 8.4 32-bit version, You cannot install other Activetcl version, otherwise it may does not work.
1.2.3 linux It's possible to work with other higher version, but, only Activetcl8.4 version has "Expect" preinstalled, unless you know how to install Activetcl module(Expect, tk,etc), please just install ActiveTcl v8.4.
2. Launch it
To launch the application, we need run autotestnet.tcl file.
2.1 Windows version
System should already bind .tcl file to ActiveTcl Wish application, so just double-clicking the file autotestnet.tcl to launch it
2.2 Linux version
by default autotestnet.tcl will be executed by "/usr/local/ActiveTcl/bin/wish". This is the default place for ActiveTcl application. If you do install it to another place, you could launch autotestnet by below two ways: . run :
[full_path_to_your_tcl_wish_bin_file]/wish autotestnet.tcl
Or, you can edit the autotestnet.tcl, change the first line to match your directory
3. Start to enjoy it
In one sentence, Autotestnet could help you to organize testcases, devices, test steps, test results and document.
3.1 Windows organization
After launch the application, you will see the main window. the main window includes three main parts.

The left part are for testcases tree. by right-click on the nodes of the tree, you could get menu to create/manage testcases tree
The right-up part are for each testcase, it includes two parts: left one is device list and right one is test element list. each time when you clicking different testcase tree node in the tree, these two windows will show related device list and test element list related to that testcase node. By right-click on device or test element, you can input/change/view related commands to the device or exact test steps related to that test element.
The right-down part is information window. system will print out running information on this window.
3.2 setup user_id and group_id
When you first lanuch the application, it will popup a window to let you to create user_id and group_id. System will create a random user_id and group_id and fill them into the fields, the default password are 123456. You could change it if you would like your meaningful name. After you input user_id and group_id, you can click "register and apply", then system will create your account and apply it to currect environment. System will remember the account and apply it automatically each time you launch the application, If you would like to apply a different account, you can click "File->User profile setting", input new account info, then click "Apply" if you already registered it before.
Why do we have "User name" and "Group name"?
Autotestnet was designed to support group sharing. "User" account only bind to user special info which includes physical devices, switch connection and test result. "Group" account could be shared by a group of testers. group account binds to all testcases date which includes testcase tree, logical devices bound to each testcase, test elements bound to each testcase.
3.3 Create a device
Any testcase has to be bound to devices. so we start from creating a device.
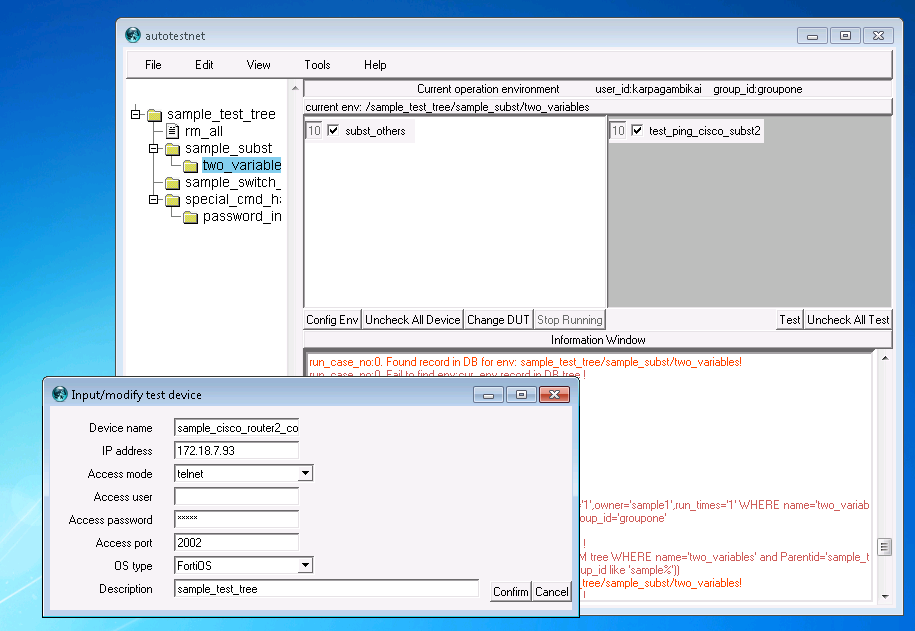
From Main menu, click "Edit"->"New device", it will pop up a window to let you input a new device. "device name" could be any name you like, "IP address" means the management ip for that device, "Access Mode" means the mode used to access the device, currently we support telnet, ssh and minicom. telnet and ssh were used and tested very often, work for linux and windows host. minicom can only be used for linux host. "Access user" and "Access password" are used for the device accessing. "Access port" would be 23 for telnet and 22 for ssh by default, but you could change it here. For Terminal server mode, like cisco 2511 to access device's console, here we can use telnet plus port 2001-2008.
"OS type" are used to specify this device's type, we could use it to detect system problem. "Description" are used for note or document.
After creating device, you can manage it by "Edit"->"Manage device"
3.4 Create a test tree
If you never created tree node before, the tree window only includes a sample tree. You could click on it to take a exact look. now let us to create a new tree.
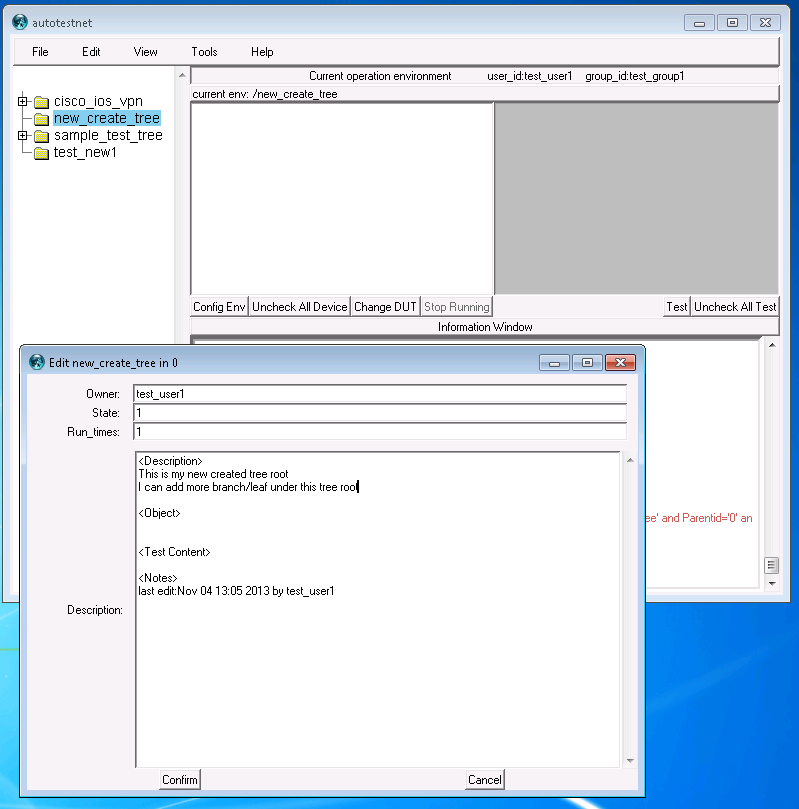
You can right-click any blank area in the tree window, it will pop-up a pull-down window, then click "new sub-env" , input a sub-env name in the pop-up window, click "confirm", system will create the new tree node and update the tree view, then you should be able to see the new-created tree node. This tree node could be a branch root for a group of testcases, or it just for one testcase.
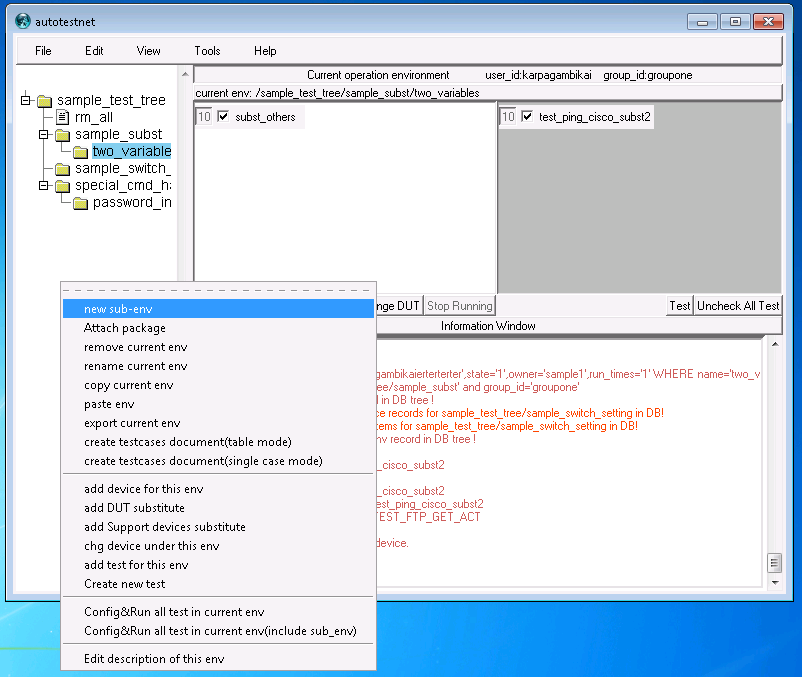
right-click on the new tree node, you can create "new sub-env" under this tree node, or you can add device or test element for this tree node, you can also "edit desciption of this env".
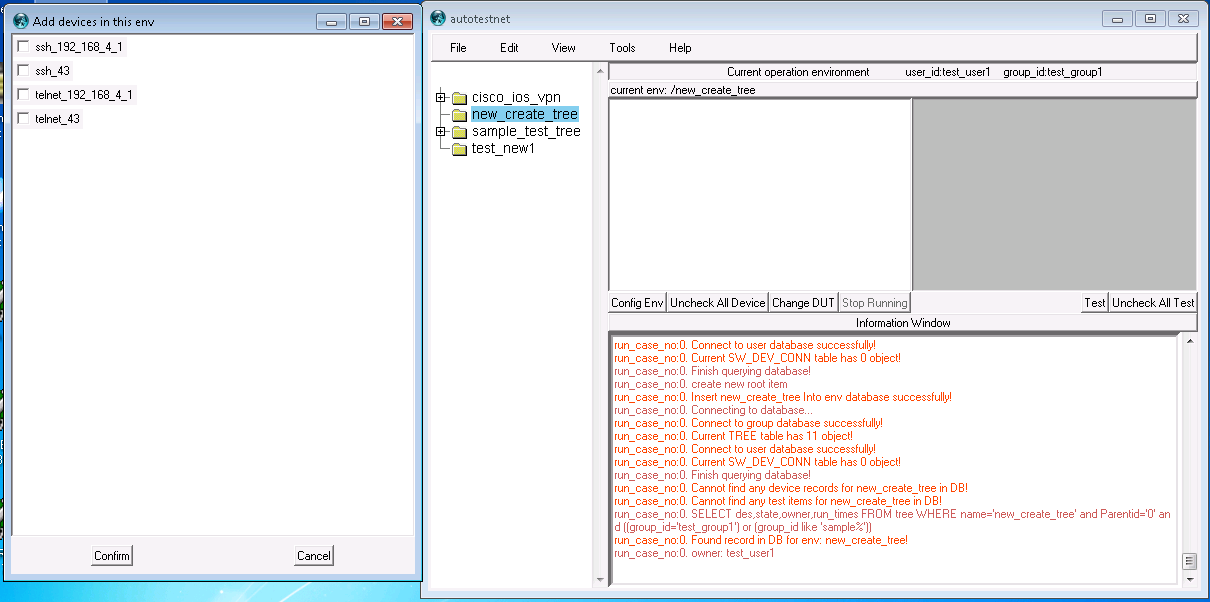
left-click "add device for this env", you will see your device list on a new window, check the devices you hope to work for this testcase, click "confirm", the chosen device will be shown on the "device-list" window. (you may need click the tree node again in the tree window to refresh the device list)
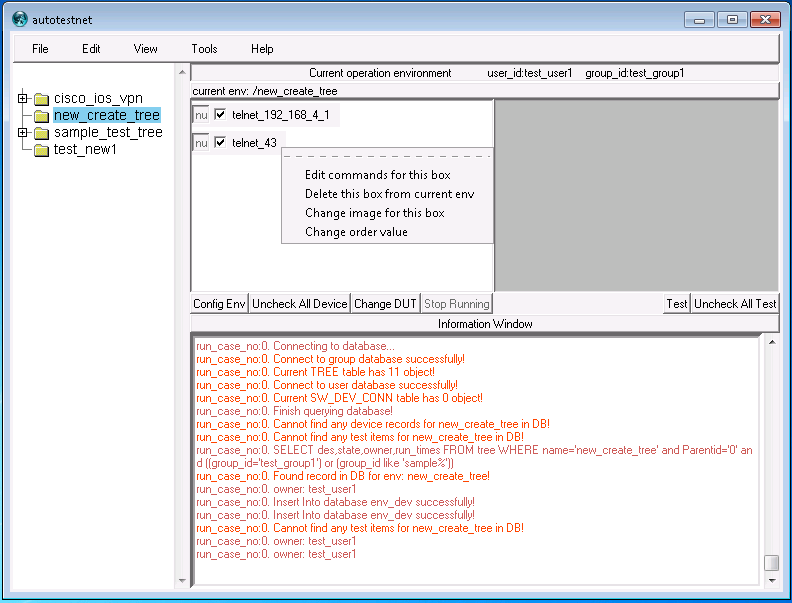
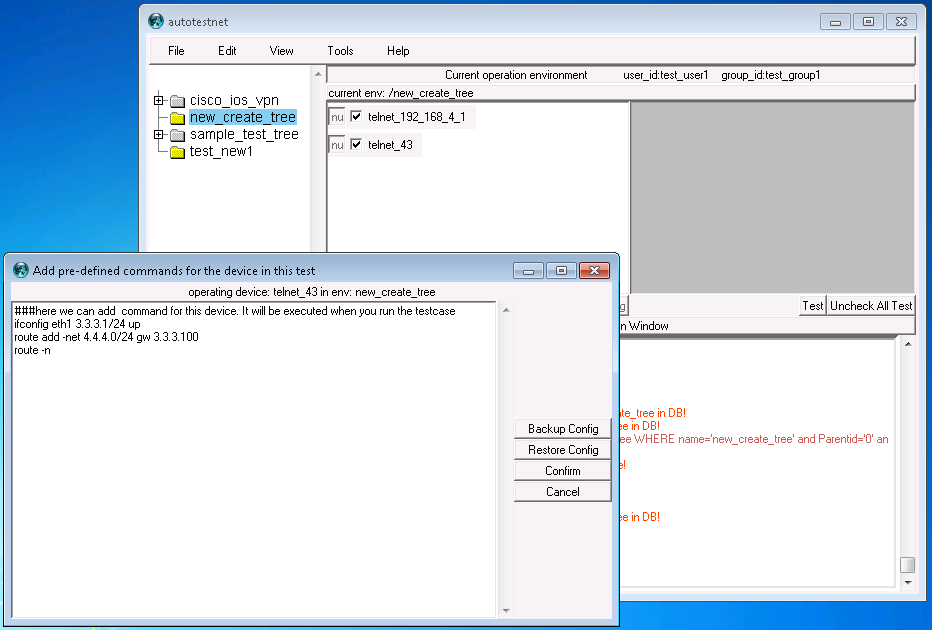
right-click on the device in the "device-list" window, click "add commands for this device", then you can input any configuration command on the new window for this device.
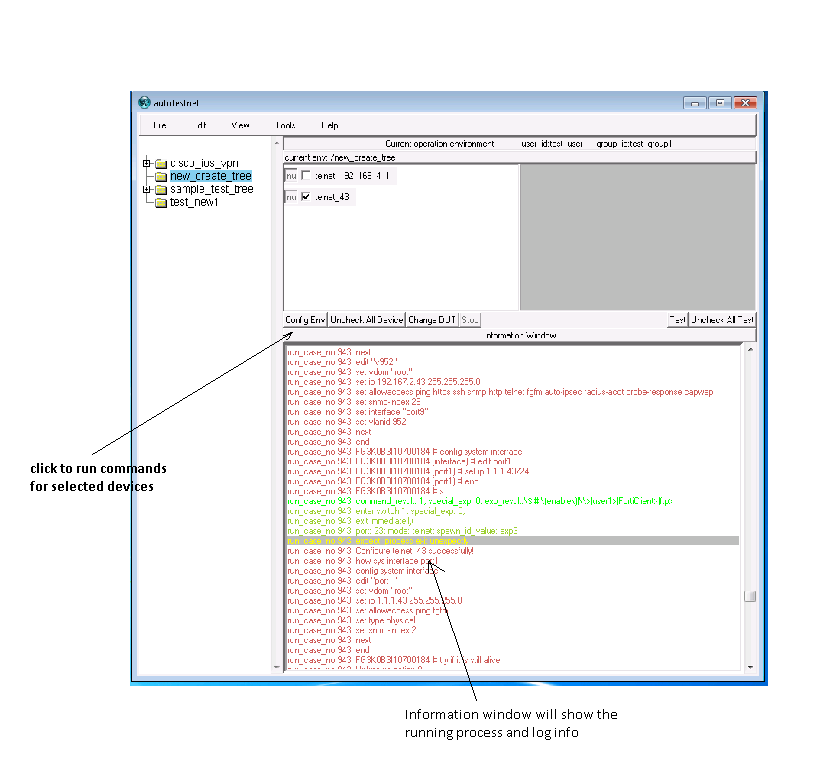
click the "config env" command button which locates between "device-list" window and "information window, system will access the device and then run the configured commands against it. From the information window, you should be able to see the running process.
3.5 Create a test element
right-click on any tree node, you can choose "create new test" to create a new test element. Another way to do this is: click "edit" on the main menu-> "manage test", it will show your test element list. then you can click the "new" button which locates on the bottom line to create a new test element.
For the "input new test item" window,
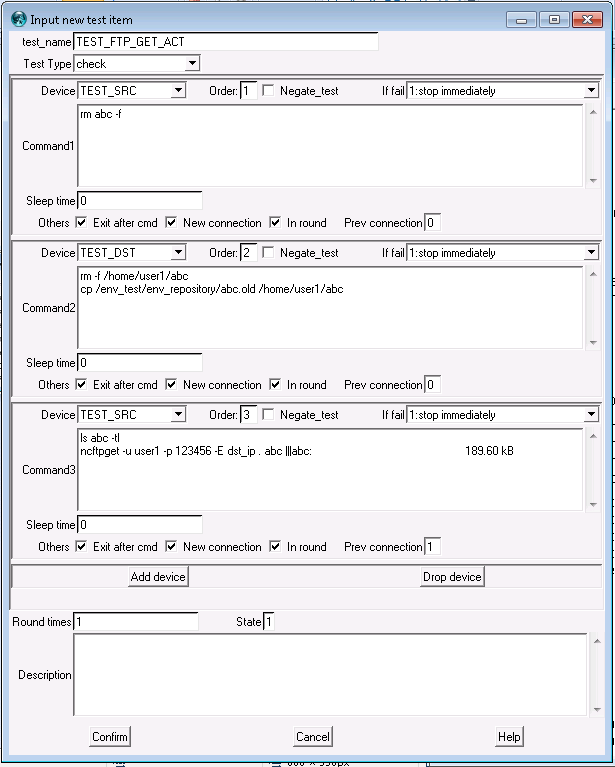
test_name : you can input a meaningful non-conflick name here. test type: "check" means running for one time. "r_check" means running again and again until it failes. then you can see multiple test-step window, each test-step window means do something for one device. You can click "add device" or "drop device" to add/delete test-step windows per your test needed.
For each test-step window, "device" means which device you will run some command on it. you can input device name or choose a device from the pull-down menu. "Order" means testing order between different test steps. "if fail" , "stop immediately" means stop test immediately. "finish current round then stop" works for "r-check" mode, system will finish the current round and then stop. "do following test" means do not stop even this step failes.
"command" window used to input commands to do the test for this device. it could be something like: ifconfig up ping 1.2.3.4 ||| reply from 1.2.3.4
This means run "ifconfig up",expect system prompt, then run "ping 1.2.3.4" expect "reply from 1.2.3.4". If it receives the string "reply from 1.2.3.4" then this test step succeeded, otherwise this step fails.
This command window supports many more command options to fulfill reall strong input/output checking. You can get more information from our documentation page.
then "exit after cmd" means system will exit the connection immediately after finish this test step, "new connection" means system will create a new connection for this test step, "in round" used for r_check mode "if fail" and "finish current round then stop", "Prev Connection" working only when "new connection" is not checked, system will use "previous connection" referenced by the "prev connection" order number.
The last, "round times" means how many round will be run for "r_check" mode. "description" used for inputing some comments for this step.
3.6 apply/run test element
After creating test element, right-click the test tree node, you can choose "add test for this env" to choose one test element for this test tree node. then you should be able to see it on the "test-element window, right-click the test-element in the "test-element window, you could edit the test and setup other options.
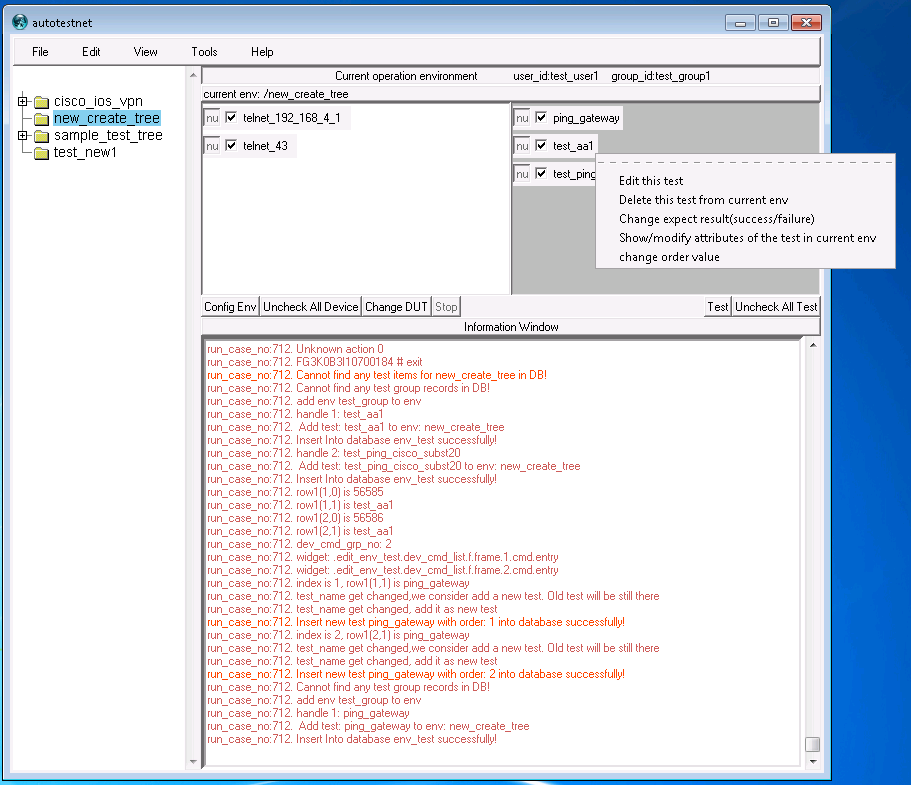
click "test" command button which between "test-element" window and "information window", you can run the test element, from the information window, you can see the test process and see if test pass or fail
3.7 run from test case tree
by the command buttons on the tops of information window, you can only run config or test element one by one. From the tree window, right-click the tree node, you can choose "config&run all test in this env" or "config&run test in this env(include sub-env)", system will do this automatically: run "device config" one by one, waiting for 10 seconds,run "test-element" one by one.
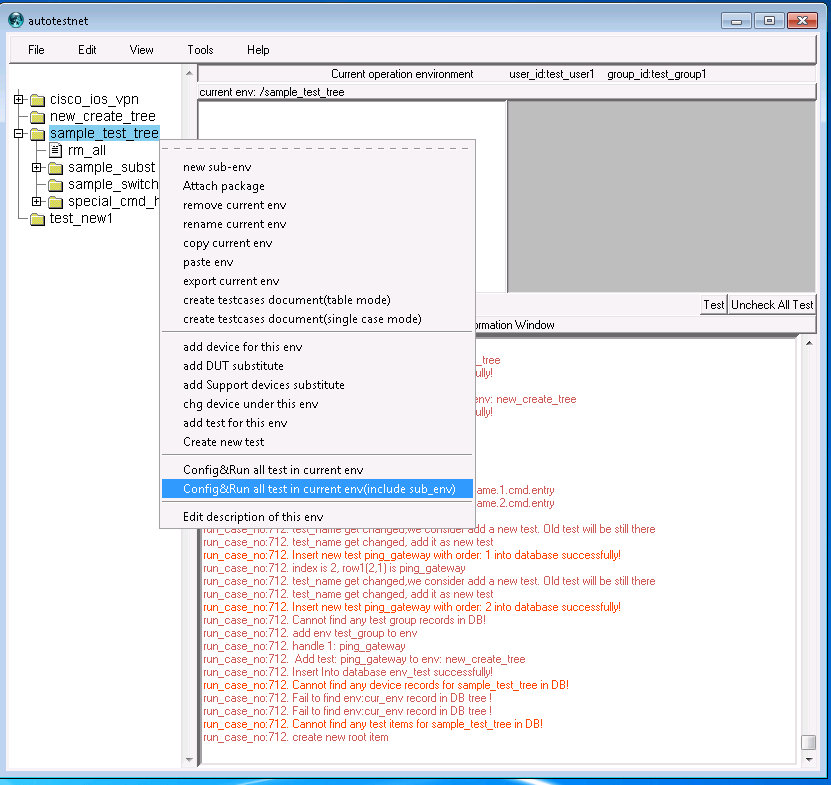
Information window will show the test result, or you can click "view"->"view test result" to check the test result.
Ok, now you have a basic idea about how to use this tool, you can then check our documentation pages to check more high-level usage for this tool.
Thanks.