User Guide for Autotestnet v2.0 Net Edition
1. System introduction1.1 what's this for
1.2 main features
2. Module introduction
2.1 test cases management
2.2 devices management
2.3 test element management
3. Devices management
3.1 Create device
3.2 Manage device
4. Testcases management
4.1 new sub_env
4.2 Attach package
4.3 remove current env
4.4 rename current env
4.5 copy current env and paste env
4.6 add device for this env
4.7 add DUT substitute
4.8 add Support devices substitute
4.9 chg device under this env
4.10 add test for this env
4.11 Create new test (element)
4.12 Config&Run all test in current env
4.13 Config&Run all test in current env(include sub_env)
4.14 show/modify description for this env
5. Test element management
6. Switch control
7. Package management
8. Other important things need to know
8.1 special prompt setting
8.2 expect special string when running command
8.3 specify special timeout for command running
8.3.1 timeout_test for all following commands
8.3.2 timeout_test for all following commands
8.4 Password input.
8.5 Newline handle.
8.6 Comment
8.7 Example:
1. System introduction
Autotestnet is an autotest support system. it gives an easy-used GUI to users(QA engineers who may have no script experience) for test operation.
1.1 what's this for?
Normally user have to learn very much script knowledge for autotest work, this makes QA engineer to be kind of software developer, this also means long time to create new script to new testcases. And, when testcases accumulated more and more, scripts will also get accumulated more and more, sometimes very hard to manage.
Autotestnet use a GUI system to let user to create and manage testcases. For each action in each testcases, user only need to input the commands to related devices and testcases, does not need to know anything about script.
In background, it's based on CLI. In theory, it can helps to do any CLI configuration and test.
For GUI-specified test, we could use selenium to convert GUI action to CLI action therefor integrate it into autotestnet system.
1.2 main features
The main features include:
. Organize testcases by a tree structure
. For different testcases, Setup device configuration and correlated test element
. Manage device access for both logical and physical devices(telnet/ssh/minicom)
. Automatically or Manually run testcases by device,test element,testcase or even a sub-tree of testcases
. Setup logical testcases package to implement a group of testcases. by mapping between logical devices and physical devices, the package could be invoked from any branch point of a test tree.
2. Module introduction
2.1 test cases management
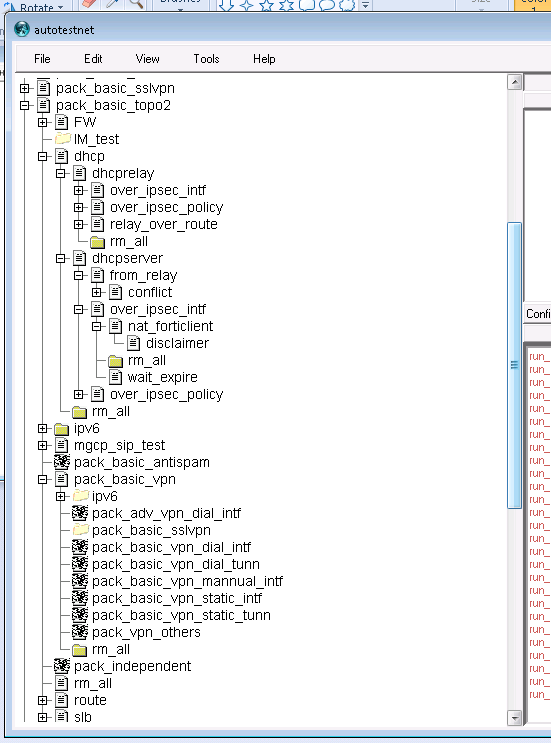
This module provides a tree structure to manage all test cases. Branchs of tree means different test projects or group of testcases, leaf of tree means single testcase. Each leaf could bind a group of devices and test elements which altogether provide the whole test actions for that leaf testcase.
User could create, remove, rename, copy and paste function for tree management.
Also, system provides package function. users can create a general test package which can be used in different test projects or testcases group. package support nesting function(package A can include package A1 and A2, then package A2 can include package B1 and B2, etc) To support sharing and backup, system provide "export" function which could export all testcase data for any branch (or whole) of the testcase tree. And, system provide "import" function to import those export file to tree.
2.2 devices management
This module help user to setup different access method for different devices. Users need setup all of their test devices in this module in advance, then later those devices could be used in testcases. Currently Autotestnet support telnet, ssh, minicom and telnet(terminal server) access method.
2.3 test element management
All test actions were done by running one or more test element. User need pre-define different test elements, then these test elements can be assigned to different testcases. Each test element include one or multiple test steps. Each step include one test devices and correlated commands, and also succeed/fail detection and correlated actions for step result.
For example, a one step test element could be: step 1: access device "test_src", run command "ping dst_ip", expect "reply from dst_ip" in response. getting "expectation" means "succeed", otherwise "fail".
a multiple step test element could be:
step 1: access device "test_src", run command "ncftpput -u user1 -p 123456 -E dst_ip . testfile1", expect "$filesize". getting "expectation" means file put succeeded (from testsrc's point of view). otherwise "fail". For action on step result: If fail, then stop test, submit "fail" result as test element result; otherwise do next step.
step 2: access device "test_dst", run command "ls /home/user1/testfile1", expect "$filesize". getting "expectation" means file received from testsrc correctly(succeed). otherwise fail. If no more steps then test element finished, submit the last step "result" as test element result.
You may already noticed I use "dst_ip","test_src" and "test_dst" in my example, it could be real ip and real device name, but here Using logical name could make this test element generalized. (will you think the case of 100 different dst_ip needing 100 different but very similar test elements is a hazard?) With logical name, we could setup mapping before invoking this test element, the mapping could help us to substitute all logical name to physical real device name or IP address.
3. Devices management
3.1 Create device
Two ways to create a device:
a. Edit(in main menu) -> new device
b. Edit(in main menu) ->manage device -> new Device
attribution list:
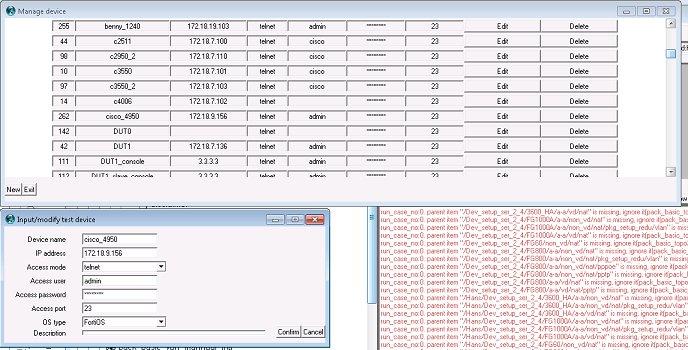
device name : Name is ID for this device. All actions for this device are associated with this name.
ip address : Access address for this device. If using terminal server, it is terminal server's IP. If using minicom, it is configure file name for minicom.
access mode : by pull_down menu, user can select telnet, ssh and minicom. Telnet is for telnet mode and terminal server mode.
access user : login user name
access password : login password
access port : for telnet mode, it's 23 by default; for terminal server mode, it's port number for the access device in terminal server
description : description of this device.
3.2 Manage device
Edit(in main menu) -> manage device By clicking button, user can browser pre-defined device list, select one to edit it or delete it.
4. Testcases management
All test cases were organized in a tree which is located in the left window. Different actions can be done by left_click object in the tree or right_click pull_down menu. Each time right_click and open pull_down menu, which is associated with an environment value: cur_env (current environment or testcase branch_id). All actions in the pull_down menu are bound for (and only for) the cur_env. Cur_env value can be changed by left_click object in the tree. click the most left-top part (or anywhere if no any tree objects exist) will change cur_env to root(/).
4.1 new sub_env
input new env name, then click "Confirm" button. It will create a new sub_env for cur_env
4.2 Attach package
system will open another window which will list all package(root level env) name. Select the one you needed and click confirm. the package will be attached to cur_env
4.3 remove current env
delete cur_env and all below objects
4.4 rename current env
input new env name, then click "Confirm" button. Cur_env name will be changed to new name. All objects under cur_env will not be changed.
4.5 copy current env and paste env
select "copy current env" , system will record it(env_A). then by left click, user can change cur_env to another value(env_B), then by right-click pull_down menu, click "paste env". system will copy env_A and all below objects to env_B.
4.6 add device for this env
system will open another window which will list all pre-defined devices. User can select one or more , then click "Confirm". system will add those selected devices to cur_env. then user can add configuration commands for those devices.Each env means a test environment, so devices under an env means devices in a test environment.
4.7 add DUT substitute
click it, system will add a pseudo device(subst_dut) in device list for cur_env. then we can setup detail substitution behaviour in device configuration for cur_env. This is for test regulation. By this function, user can setup device(DUT) substitution for following test. For example: current env is for test device FG400_1, we already have some configuration setup in cur_env and its parent env for FG400_1. then we need to invoke pre_defined test package pack_basic_vpn. in the package, for generalization purpose, the test device's name is DUT1. So, before invocation, we have to substitute DUT1 to FG400_1, and interface name need be substituted as well. At this time, we can "add DUT substitute" to setup these substitution.
4.8 add Support devices substitute
click it, system will add a pseudo device(subst_others) in device list for cur_env. then we can setup detail substitution behaviour in device configuration for cur_env. This one is similar as DUT substitute. the difference is this one can be used for multiple devices substitution. In general, this one is used for devices substitution except DUT.
4.9 chg device under this env
system will open another window for specifing original device and change_to device and options. this function can be used to change one device name to another device name under cur_env. At the same time, other strings like interface name can also be changed. This change is permanent, donot like substitute(4.7 and 4.8) which is temprary.
4.10 add test for this env
system will open another window which will list all pre-defined test elements. User can select one or more , then click "Confirm". system will add those selected test elements to cur_env. then user can define expect test result for cur_env(some test elements were expected to fail and some other test elements were expected to succeed).
4.11 Create new test (element)
reference to "test element management"
4.12 Config&Run all test in current env
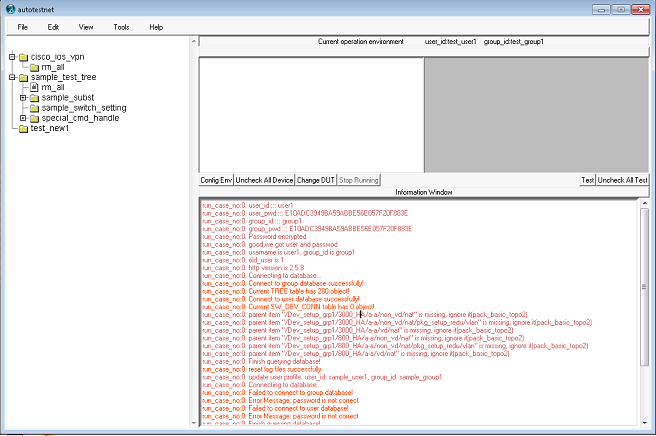
by clicking this item, system will "config cur_env" and then "run cur_env". "Config cur_env" means system will access device which is in the device list of cur_env one by one. and send pre_defind configuration commands to the device. "run cur_env" means system will run all test elements which is in the test element list of cur_env one by one. Test result will display in information window(right bottom window) After "Config cur_env" , system will sleep for 10 seconds(which can be changed in config file), and then run "run cur_env".
4.13 Config&Run all test in current env(include sub_env)
Similar as 4.12. Difference is it will do same action for cur_env and all sub_env under cur_env. ***An integrated behaviour is about "rm_all" env. Each time system access a new sub-level of cur_env, system will try to look up an "rm_all" env in current level, before run other sub_env in same level, system will run the "rm_all" env firstly. The purpose of this behaviour is for clearing test environment, other sub_env in same level maybe change test environment(device configuration,etc), then user have to re-setup them in "rm_all" env of the same level. If no "rm_all" exist in the level, system will ignore it.***
4.14 show/modify description for this env
System will open a text window which can be used to record some comments or documents for cur_env.
5. Test element management
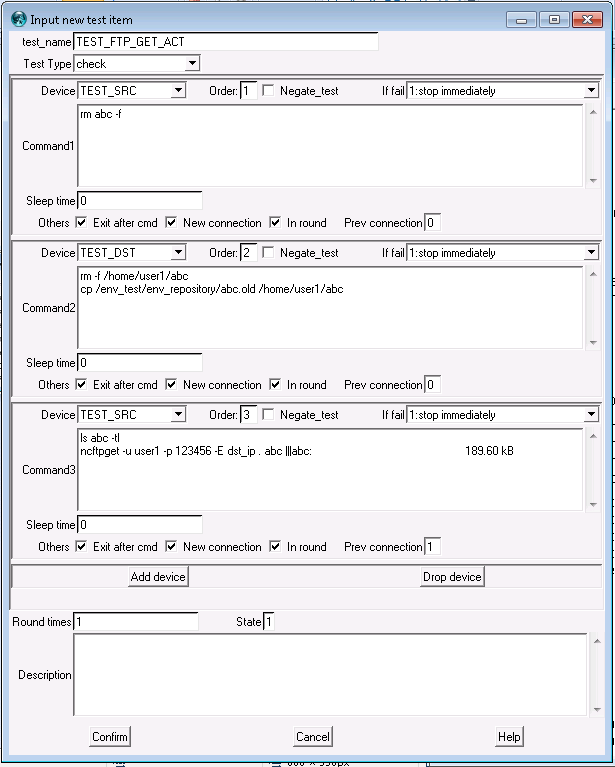
Click "Edit" in main menu->manage test, System will open another window to list current pre-defined test elements. User can click "edit" to edit one test element, click "new" to create a new test element, click "delete" to delete a test element.
Test element attributes:
Test_name : ID for this test element.
Test Type : check and r_check. check means run it for one time. r_check means run it for ever until getting expect result.
In each test element, you can define multiple steps for the test, each step is associated with one device. You can click "Add device" or "Drop device" to add or delete one device.
In each device area:
.Device : device ID. You can input device_id directly or choose one device from the menu.
.Order : The order number to execute
.Negate_test : checked means expecting opposite behavior(hope to not get the expect result).
if fail : you can choose behavior if this step fail.
command area: You can input test command here
sleep time : after this step, sleep for this number of seconds
Exit after cmd : clicked means system will disconnect connection to that device immediately after finish this step. otherwise it will keep the connection until total test element finished.
New connection : clicked means system will establish a new connection for this step. otherwise you have to input "prev connection" order number,then system will try to use previous connection.
In round : clicked means this step will be included in running if test type is r_check.
Round times : Used to setup the round times if test type is r_check
State : You can define a state id for this test. from "edit->options" you can choose which test state to run
How to expect result?
In test command, you can add 'expect text' after command by '|||' directly. for example: exec ping 192.168.6.222 |||reply from 192.168.6.222 exec ping 192.168.6.222 |||reply from 192.168.6.223 In each test, if test does not get any one expect text and no negate checked, program will stop to run left commands and left tests and exit with fail result. You can also specify a timeout value to overwrite default timeout value(15 seconds) exec ping 192.168.6.222 |||reply from 192.168.6.223|||30 then system will wait for at most 30 seconds to expect response.
6. Switch control
system supports to control switch therefore changing topology in autotest phase.
First you should input switch-device connection in sw_dev_conn table of your private database.(this part was not implemented in GUI version yet) in table sw_dev_conn, you need input dev_name, dev_port, sw_name and sw_port(the device's port connect to).
Second you need add a logical device switch_cmd into your device list. (from edit->new device, just need input name and left every other field blank.
Lastly, in your testcase, you can add switch_cmd device to your devices for configuration. For commands, the syntax is like: set_sw_port dev_name dev_port up|down access|trunk vlan_id
i.e. 1. set_sw_port hans_router1 eth0 up access 10
his command will search sw_dev_conn table, find the sv_name and sw_port for hans_router1's eth0 port. Then access to that switch, set the sw_port to UP state, Access mode and vlan 10.
2. set_sw_port hans_router2 eth1 up trunk 3-5,10 This command will search sw_dev_conn table, find the sv_name and sw_port for hans_router2's eth1 port. Then access to that switch, set the sw_port to UP state, trunk mode and allow vlan 3-5,10 for that trunk.
3. set_sw_port hans_router2 eth2 down anything anything This command will search sw_dev_conn table, find the sv_name and sw_port for hans_router2's eth2 port. Then access to that switch, set the sw_port to DOWN state.
To make this work, you have to input switch device to device table to tell system how to access it. system support cisco CatOS and IOS cli mode.
7. Package management
system support package function. you can create a test package for a feature. All devices in this test package are logical devices. Then other guy can invoke this package to do similar test in their lab(different physical devices and switch connection table). The only thing they need to do firstly is create a matching. system use subst_dut and subst_others to implement this matching. Please check sample to see how to set it up.
8. Other important things need to know
8.1 special prompt setting
1. system has fixed prompt setting which is "$|#", it means system will expect to get "$" or "#" to confirm command finished correctly. it works for most cases but in case of it does not work, like your command output has "#" which will confuse the expect system, then you can custom "prompt" case by case. an example is:
prompt_test prompt_str>>>
PS1="prompt_str>>>"
real_command1
real_command2
....
real_commandn
The first line means setting up special prompt as "prompt_str>>>" by prompt_test command, the second line is standard linux shell command which change the system prompt to "prompt_str>>>". Real commands are starting from the third line. By these setting, only for this connection, autotestnet will expect prompt as "prompt_str>>>" after each real command. "prompt_test reset" means back to original system prompt.
8.2 expect special string when running command
In any command setting, we could specify an expect string for checking. This was mostly used in test element to detect if test get expected result or not. To setup expect string, we add "|||" followed by exptect str: command_str|||expect_str
###below command run "ping 192.168.1.1" , expect to get "reply from 192.168.1.1"
ping 192.168.1.1 |||reply from 192.168.1.1
8.3 specify special timeout for command running
By default, autotestnet has a 15 seconds timeout value setting. it could be changed by "Edit->Options". If does not get expect string or expect prompt in this timeout value, command running was considered as failed.
You may need to specify special timeout for some special case. we have two way to do this:
8.3.1 timeout_test for all following commands
we could use "timeout_test [timeout_value]" command to specify special timeout_value for the following commands in that connection.
###Below commnad to change timeout value from default(15 seconds) to 120 seconds. only effective in current session
timeout_test 120
ncftpput -u test_user -p test_password -P test_port -F dst_ip . test_file1|||189.60 kB
ncftpput -u test_user -p test_password -P test_port -F dst_ip . test_file2|||189.60 kB
ncftpput -u test_user -p test_password -P test_port -F dst_ip . test_file3|||189.60 kB
8.3.2 timeout_test for all following commands
we could setup special timeout for any one command by "command_str|||expect_str|||timeout_value". If you don't have expect_str for this command_str, then just use "command_str||||||timeout_value"
###Below command will expect 189.60KB with timeout value as 90 seconds
ncftpput -u test_user -p test_password -P test_port -F dst_ip . test_file1|||189.60 kB|||90
###Below command will expect system prompt(no special string expected) with timeout value as 90 seconds
ncftpput -u test_user -p test_password -P test_port -F dst_ip . test_file1||||||90
8.4 Password input.
By default, for each command string, after sending out it to device, it will be put into the expect buffer automatically. To make expect matching system more accurately, autotestnet will expect the command string itself firstly, this could guarantee the left buffer content are exactly the response of this command. but this behavior will fail in "password input" case because password was inputed invisibly, then autotestnet will timeout when expecting the command itself. for this case, we could setup special timeout as 10000 which means ignoring expecting command string itself
###For below case, system will send out "cmd_string", then expect "exp_str" directly without expect "cmd_string" firstly
cmd_string|||exp_str|||10000
8.5 Newline handle.
By default, each command ended by a newline "\r". there are special case in which only input something without newline. To disable default newline: "newline_test 0". this command can only take effect for the next one command. For any command you need to disable "default newline" feature, just insert this special command "newline_test 0" before it.
newline_test 0
8.6 Comment
a prefix "###" to conver the following command line as a comment.
###This is comment line
real_command
###comment line again
8.7 Example:
###The next prompt_test command to change default prompt to "Password", that means running "telnet 172.18.7.72" then wait for prompt string "Password"
prompt_test Password
telnet 172.18.7.72
###The next prompt_test command to change prompt to ">". that means running "cisco" then wait for prompt ">"
prompt_test >
###cisco||||||10000 means: input command string "cisco" , does not expect any special string, so expect prompt directly. setup special timeout to 10000. because 10000 is a special value for "Password input", so it will not change default timeout value, but consider the command "cisco" as "password input",so autotestnet will not expect "cisco" after sending out command string "cisco".
cisco||||||10000
prompt_test Password
###input "en" expect prompt "Password"
en
###reset to default prompt
prompt_test reset
###input cisco, expect prompt directly, consider it as "password input" so autotestnet will not expect "cisco" itself
cisco||||||10000
###good, we should already login to 172.18.7.72 enable status now
show version